老规矩我们先上个链接https://genome.ucsc.edu/
UCSC Genome Browser是由University of California Santa Cruz于2000年7月创立的旨在通过它迅速而且可靠地浏览任何一部分基因组,并同时获得与该部分相关的基因注释信息,包含但不限于已知基因,预测基因,表达序列标签,信使RNA,CpG岛,小鼠同源性等等此类基因组学信息的专业级浏览器。此外UCSC Genome Browser还具有开放性,能根据用户科研或者教育需求加上自己的注释信息。Ensembl 就是使用它的人类基因组序列草图为基础的。(首页上点击UCSC Genome Browser Project History有关于UCSC Genome Browser整个发展历史和视频介绍,有兴趣的小伙伴可以去看看,挺有意思)
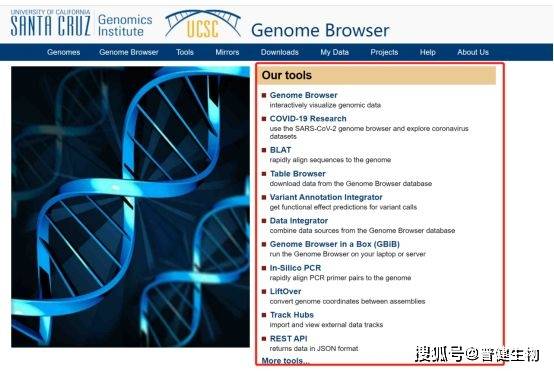
我们来看看UCSC Genome Browser功能到底有多强大。Our tool集成数据库以及基因组学常用工具(Genome Browser、Table Browser、Gene Sorter、Proteome Browser、VisiGene、Genome Graphs、BLAT等)。如果使用这些工具还有问题或者是想找个专业人士讨论一下,那么你还可以写email到genome@soe.ucsc.edu获得专业帮助,是不是很友好?
我们点击「Genome Browser」,进入如下页面后,在搜索框中输入「基因名称」,并选择「种属」。
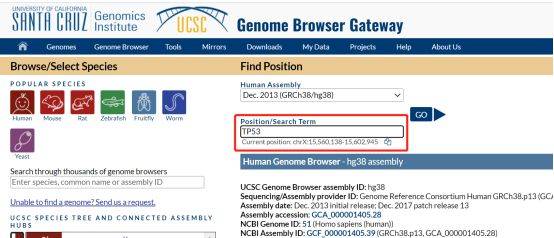
我们尝试输入大热TP53,选择人类。跳转到以下界面:
蓝色方块(用红色圈出)和箭头(用黄色圈出)分别代表外显子和内含子,将鼠标移动到相应位置,会显示外显子和内含子的名字,点击后可以查看到更多的信息。
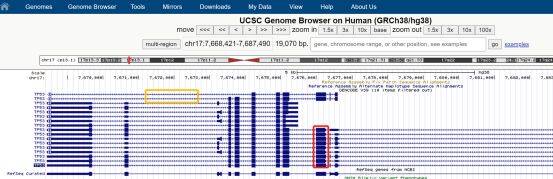
下面的柱状图代表TP53基因在54种组织中的表达量,点击进入会出现更详细的箱线图。


ENCODE(Encyclopedia of DNA Elements)记录的顺式调控元件(cis-regulatory element)候选者。点开后可以看到ENCODE的具体方法,不同颜色的方块代表有不同含义。黄色,代表远端增强字样特征。紫色,代表组蛋白标记的富集情况,点击后,会显示关于组蛋白标记的详细解释,组蛋白会影响转录和染色质。蓝色的峰值图展现了100个脊椎动物用PhyloP方法分析得到的保守区域,可以看到外显子对应的区域相对来说保守程度高。以下黑色的图表,展现了恒河猴、小鼠、大象、鸡、青蛙、斑马鱼对应片段的保守区域,可以看到外显子对应的区域DNA相似度较高,较为保守。

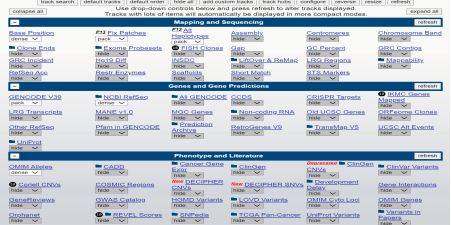
下面的表格有各种模块和选项,可以挑选感兴趣的项目展示出来。
我们再来试试比较有特色的customTrack功能,此功能可以追踪我们的reads到底比对到了参加基因组的什么区域,或者追踪参考基因组的各个区域的覆盖度,测序深度。跟着UCSC网站上的使用说明走一遍(内容源自网络,大神教程)。
Step 1. Format the data set
我们支持非常多的Track文件格式,尤其是标准的GFF文件,还包括:bedGraph, GTF, PSL, BED, bigBed, WIG, bigGenePred, bigMaf, bigChain, bigPsl, bigWig, BAM,CRAM, VCF, MAF, BED detail, Personal Genome SNP, broadPeak, narrowPeak, and microarray (BED15).
染色体一定是chrN 类型的标记,大小写敏感!也支持多种或者多个annotation的track文件。
Step 2. Define the Genome Browser display characteristics
设置浏览器选项,是否在Genome Browser里面显示UCSC的其它数据类型,包括hide/dense/pack/squish/full各种选项,包括ENCODE计划等各种公共数据是否需要显示。Add one or more optional browser lines to the beginning of your formatted data file to configure the overall display of the Genome Browser when it initially shows your annotation data.
这个非常复杂,但是一般就定义有限的几个属性即可。
Step 3. Define the annotation track display characteristics
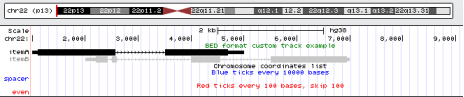
设置如何显示自己的数据,包括颜色,数据名,数据描述情况。Following the browser lines--and immediately preceding the formatted data--add a track line to define the display attributes for your annotation data set.
下面这幅图里面的一些track的颜色,形状,注释,都是可以设置的,设置规则需要自己详细读说明书啦。
Step 4. Display your annotation track in the Genome Browser
重点就是上传自己的文件,步骤是:
open the Genome Browser home page ,click the Genome Browser link in the top menu bar.
On the Gateway page that displays, select the genome and assembly on which your annotation data is based, then click the "add custom tracks" button.
看到下面的图片的链接,点进去就好啦
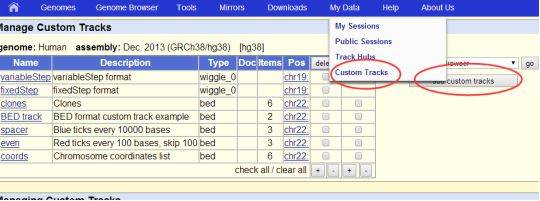
On the Add Custom Tracks page, load the annotation track data or URL for your custom track into the upper text box and the track documentation (optional) into the lower text box, then click the Submit button. Tracks may be loaded by entering text, a URL, or a pathname on your local computer.
用户可以提交多种格式的自定义track文件
seeLoading a Custom Track into the Genome Browser.
提交完毕之后,直接回到 Genome Browser 页面就可以看到了,这个工具不默认跳转。
Step 5. (Optional) Add details pages for individual track features
Step 6. (Optional) Share your annotation track with others
这是可选的步骤,自己去探索:read the section Sharing Your Annotation Track with Others.
我这里添加了一个UCSC也提供的一个wig文件:http://genome.ucsc.edu/goldenPath/help/examples/wiggleExample.txt 作为测试例子,显示如下:
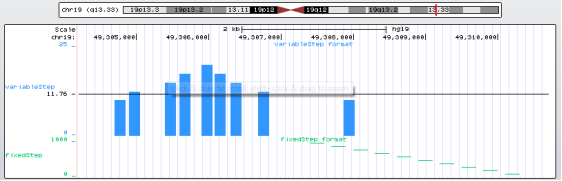
UCSC Genome Browser还有设置了不同地区的镜像网站,可以说是相当贴心。作为一款功能强大的针对基因组学的浏览器,UCSC Genome Browser还有很多神奇的功能,篇幅所限我们今天就分享到这里啦~
- 本文固定链接: https://maimengkong.com/kyjc/1132.html
- 转载请注明: : 萌小白 2022年7月30日 于 卖萌控的博客 发表
- 百度已收录